
This is a very simplistic project to demonstrate the use of RFID technology. It uses the NXP MFRC-522 chip to communicate with Mifare Classic EV1 1K RFID tags.
It is intended to be used in the lecture "Soziotechnische Studien: Container, Paletten, Verpackungen" taught by Prof. Dr. Martin Binder at PH-Weingarten.
The project can be used in conjunction with this RESTful backend and this web frontend.
This project consists of two components: a hardware component and a software component. To get this project up and running follow these steps.
This project is intended to run on a Raspberry Pi. You will need the following hardware:
- Raspberry Pi 3+/4/5
- Micro SD Card (16GB)
- RC522 RFID Modul
- Breadboard Wire
- Breadboard
Follow this tutorial to setup your Pi up as a headless computer.
In the Imager software select Raspberry Pi OS Lite (64-bit) as operating system. Edit the OS customization settings, so they look something like this:


Replace the wireless LAN SSID and password with the ones from your wireless network.
To access your Pi, either connect it to a monitor and keyboard, or use SSH to access it. In the later case, use these tutorials to connect to your Pi: for Windows/for Mac. To log in, use the username and password you configured in the Imager software.
The ssh command should look like this:
ssh pi@raspberrypi-1.localAt the end of this step, you should have a command line in front of you where you can enter commands.
You can check it by running the command whoami which shoud give you pi ;)
To use the GPIO-pins of the Pi, use the raspi-config tool to enable the SPI interface under System Options.
Shutdown your Pi to set up up the wiring using the following command:
sudo shutdown nowConnect the RFID reader to your Pi. You can follow the instructions in the original post.
It should look like this:
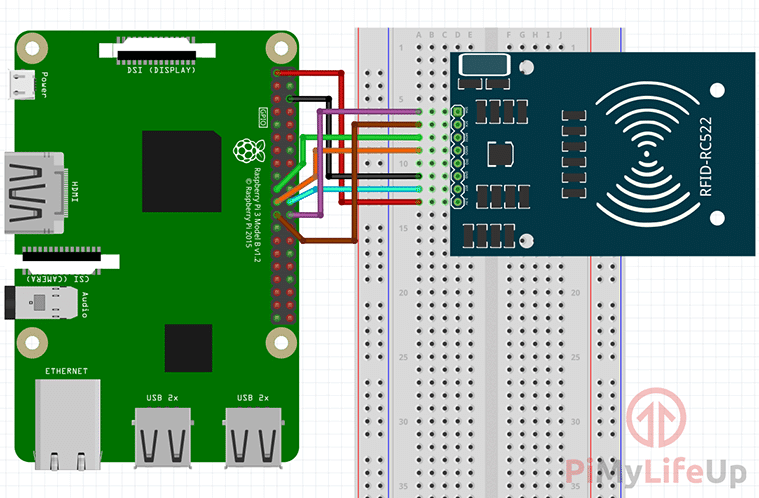
This Raspberry Pi pinout guide might also be helpful.
The following steps should all be completed on your Pi.
This demo uses the python programming language. It comes preinstalled on Raspbian OS, but running the demo requires a few additional tools. Install them using the following command:
sudo apt install python3-dev python3-pip gitThe two important tools used here are pip and git.
Download the sourcecode from this repository by running the following command:
git clone https://github.com/ITBenni/himbeer-verfolgung-rfid.git && cd himbeer-verfolgung-rfidInstall additional project dependencies by running:
pip install -r requirements.txtThis mainly install the python library necessary for interacting with the RF522 RFID module.
The main program resides in rfid.py. Run it using this command:
python3 rfid.pyAny contributions are welcome :) If you find any errors or if you have feedback, please open an issue on Github.
Distributed under the MIT License. See LICENSE for more information.
This project stands on the shoulders of giants. Those are:
- Ondřej Ondryá'š (ondryaso) RC522 python library
- Angus Young's (gus-0) original post on PiMyLifeUp
- Mario Gómez's (mxgxw) RC522 python library
Without these amazing people this project would't have been possible.